Mitigation block and Propulsion block: two OB variants
A mitigation block is an OB that fails without a sweep; a propulsion block is an OB born from a parent OB. How to tell them apart, enter and place stops on gold H1.
Concept Dictionary · Entry 4
Quick recall: a sweep means breaker, no sweep means mitigation, an OB born from an OB means propulsion.
So far you have two blocks: the Order Block (where the push started) and the Breaker (an OB that failed after a sweep, then flipped roles). This entry adds two more members of the "OB family":
- Mitigation block: an OB that fails and flips roles, but without a sweep.
- Propulsion block: a new OB born from a parent OB on the pullback, used to continue with the trend.
This entry reuses definitions from earlier ones: What is an FVG, Order Blocks with FVGs and Breaker block.
What is a mitigation block?
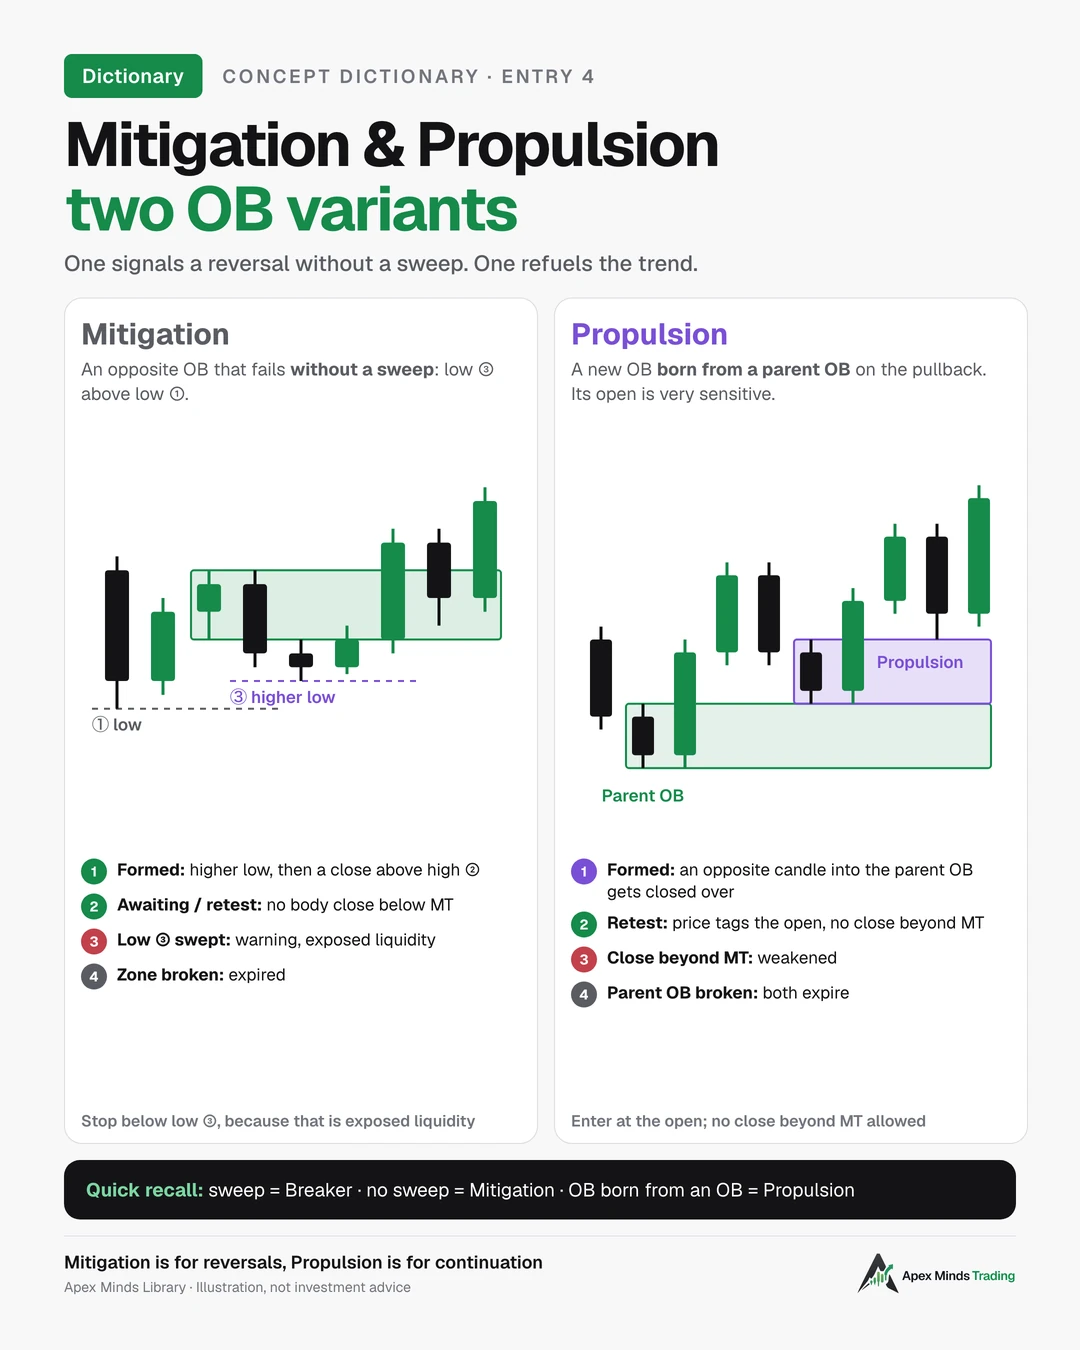
A mitigation block is an opposite OB that has failed without a liquidity sweep.
Price tries to continue the old trend but runs out of steam and can't make a new low (or new high). This short swing is called a failure swing. Price then turns and breaks structure.
The practical ICT book describes mitigation as a reversal pattern: price fails to make a lower low (or higher high), then breaks the nearest high (or low) to shift structure. The failed price area is then marked as the mitigation block and acts as support or resistance.
Like a breaker, a mitigation block is named after the direction price goes after it forms. A failed bearish OB creates a bullish mitigation block.
The four swings of a bullish mitigation block
Context: price is in a down leg, with highs and lows stepping lower.
- Low. The lowest low of the down leg.
- High. A lower high than the previous one, like any pullback in a downtrend.
- Higher low than low 1. Price drops again but runs out of steam and doesn't reach the old low. This is the failure swing.
- A candle closes above high 2. The bearish OB at high 2 is broken.
Why point 4 doesn't contradict "fails to break structure". The "failure" refers to point 3: price can't break low 1. Point 4 is when price breaks the nearest lower high (high 2), and that is exactly the structure shift the book requires. The practical ICT book describes this sequence: a lower low, a lower high, a failure to make a new low, then a break above that lower high.
A bearish mitigation block reads the other way: high, low, a lower high than high 1 (out of steam), then a candle closing below low 2.
The mitigation zone. The practical ICT book treats the whole failed price leg as the mitigation zone, but the last up candle at high 2 reacts most strongly. This series' convention: mark the last up candle before high 2, just like a breaker. Use the full zone to check validity, and the body and MT (50% of the body) for entries.
How is mitigation different from a breaker block?
Only at point 3.
- Breaker: low 3 is below low 1. Price swept the liquidity under the old low before turning.
- Mitigation: low 3 is above low 1. Price swept nothing; it just ran out of steam.
The ICT video lectures Apex refers to say it plainly: a breaker must sweep the previous swing, while mitigation is only a failure swing.
When low 3 is almost equal to low 1. If low 3 is only slightly higher than low 1, it is really equal lows, and equal lows are the most exposed liquidity there is. This series' convention (not tested on data): if low 3 is less than 10% of the height of the leg from point 1 up to point 2 above low 1, treat them as equal lows. Then don't enter at the mitigation block; wait for price to sweep the two lows. If price then breaks above high 2 after that sweep, the pattern becomes a breaker.
The weakness of mitigation, and how to offset it
The lecturer says he doesn't like trading mitigation blocks at reversals. The reason: low 3 (the failure swing) leaves a clear low, which is a cluster of stop losses. That liquidity is still intact. Price often comes back to sweep it, so mitigation blocks fail more easily than breakers. A breaker has already "cleared" the liquidity at point 3.
The practical ICT book adds an important detail: mitigation often forms after price has reached a major reference area, such as an OB, a breaker, or after taking liquidity on a higher timeframe. In other words, the sweep may have happened on the higher timeframe, while the lower timeframe only shows a failure swing.
So this series uses mitigation only with three conditions:
- Higher-timeframe context is required: price has just tapped an H4 zone (FVG, OB, breaker) or swept an H4 high or low.
- Prefer an FVG overlapping the mitigation zone, as evidence the break had force.
- Place the stop below low 3, not right below the mitigation zone, because low 3 is where price likes to sweep.
A note on the word "mitigation". Some lectures also use the word more broadly, for example for price returning to an old OB to "mitigate" positions. To keep one definition per term, this series only uses the structural meaning: an opposite OB that failed after a failure swing.
The five states of a mitigation block
1. Formed.
- Signs: all four swings are in place, low 3 is above low 1 (not equal lows), and a candle has closed above high 2.
- Check right away: is there higher-timeframe context, is there an FVG?
2. Awaiting retest.
- Signs: price has moved up away from the zone and hasn't returned.
3. Retested.
- Signs: price pulls back to the zone, no candle body closes below the MT, and price bounces.
- This is the time to enter.
4. Low 3 swept (a state specific to mitigation).
- Signs: price cuts through the mitigation zone and pokes below low 3.
- If the candle closes back above low 3: warning, liquidity has just been taken, and a stop placed tight under low 3 may have just been hit.
- If the candle closes below low 3: the bullish structure has broken.
5. Expired.
- Signs: a close below the zone and below low 3; or the zone has already been used once; or it is too old (series convention: H1 two sessions, H4 three to four days).
Example: a bullish mitigation block on XAU/USD H1
Illustrative figures, not actual prices at the time you read this.
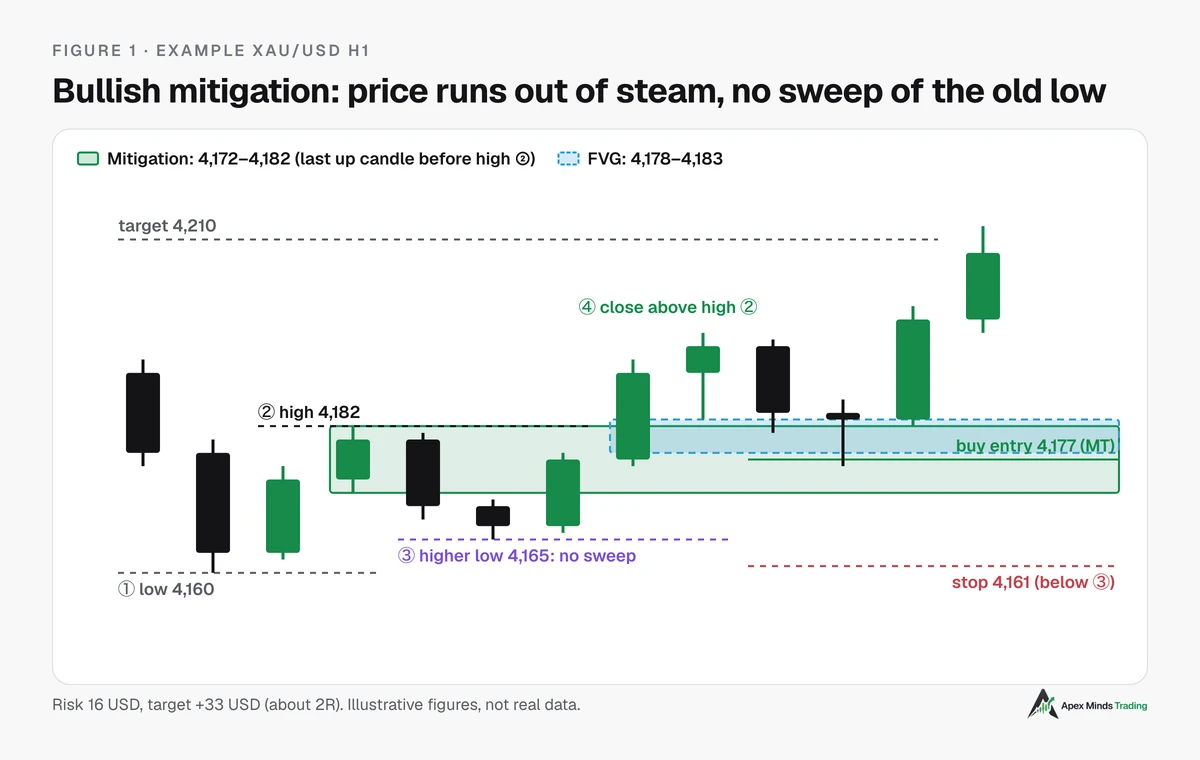
Context: price is falling and has just entered an H4 FVG (a higher-timeframe zone).
What happens:
- Price makes a low at 4,160 (point 1).
- Two up candles push price to a high at 4,182 (point 2), a lower high than the earlier highs of the down leg. The last up candle (low 4,172, high 4,182, body 4,174–4,180) is the bearish OB.
- Price drops again but only to 4,165, five dollars above the 4,160 low (point 3). The leg from point 1 to point 2 is 22 USD tall, so 5 USD is about 23%, above the 10% marker. This is a failure swing, not equal lows.
- Two strong up candles follow; the second closes at 4,190, above the 4,182 high (point 4). A bullish mitigation block forms: zone 4,172–4,182, MT about 4,177.
- The push leaves an FVG at 4,178–4,183, overlapping the mitigation zone at 4,178–4,182.
Why can the FVG overlap the mitigation zone? An FVG is measured from candle 1 and candle 3 of the push, not from the OB candle. Here the push starts from low 3 (4,165), below the mitigation zone. Candle 1 of the push has a high of 4,178 and candle 3 has a low of 4,183, so the gap is 4,178–4,183. The two zones only share price levels. This is the overlapping case, the tightest entry zone.
State at entry: price pulls back, a wick dips to 4,176, and the body closes at 4,183. The mitigation block has been retested.
Trade plan:
- Buy entry: 4,177, at the zone's MT.
- Stop loss: below low 3 (4,165) by a buffer. The example uses a 4 USD buffer, giving a stop at 4,161. That buffer is an assumption: measure the spread and typical H1 wick length on your broker to choose your number.
- Target: 4,210, a high above (illustrative).
- Calculating R: R = entry − stop = 16 USD. Profit to target = 33 USD, about 2R. If your buffer differs, recalculate with this same formula.
Below low 3 or below the zone? A stop below low 3 risks 16 USD. A stop just below the zone (4,168) risks only 9 USD, 7 USD less, with a much better reward-to-risk. But 4,168 sits above low 3, exactly where price likes to sweep. With mitigation, the price of saving those 7 USD is getting swept more often. This is the most important practical difference from a breaker.
What is a propulsion block?
A propulsion block is a new OB born from a parent OB, formed when price pulls back into the parent OB and pushes on.
Picture the second stage of a launch pad: the first pad launched price, price came back to rest on it, and a smaller pad formed on top of the old one to push price further.
The ICT video lectures describe the sequence (for a bullish propulsion block):
- There is a confirmed parent OB: price has already closed beyond its opening price.
- Price pulls back, and one (or a run of) down candles moves into the parent OB. That candle can start above the parent OB, as long as it reaches into the parent OB zone.
- Price closes beyond the opening price of that down candle. The propulsion block has formed.
According to the lectures, the propulsion block's opening price is very sensitive, and price should not break its MT (50% of the body).
Where sources define it differently
- The practical ICT book: has no dedicated chapter on propulsion blocks in its PD Array list.
- SMC material: describes propulsion more broadly: a point where the market pushes strongly after a consolidation, where large money drives price, used for trend continuation.
- The ICT video lectures: the narrowest and most concrete definition, as above.
This series' convention: use the lectures' definition, because it can be marked precisely on a chart. Add one condition from a more recent lecture by the same author: the parent OB must sit at a key zone (a higher-timeframe FVG, a higher-timeframe OB, an old high or low). Many people call any small OB in a trend a propulsion block, but if the block isn't tied to any key zone, the author doesn't count it.
Is a propulsion block an order block?
Yes. A propulsion block is an OB; it just forms right on top of another OB.
- A regular OB needs its own context: a key level, a sweep, a push.
- A propulsion block relies on the parent OB. It shows the parent OB is holding and buyers are adding a second time.
- The propulsion zone is usually narrower and higher than the parent OB, so entering there gives a shorter stop than waiting for price to go deep into the parent OB.
The five states of a propulsion block
1. Parent OB holds.
- Signs: price pulls back to the parent OB, with an opposite candle moving into it.
2. Formed.
- Signs: a candle closes beyond the opening price of that opposite candle. Mark the propulsion zone, its MT and its open.
3. Retested.
- Signs: price pulls back to the propulsion block's open, no candle body closes beyond the MT, and price moves on.
- This is the time to enter.
4. Weakened.
- Signs: a candle body closes beyond the propulsion block's MT. The propulsion zone has weakened, but the parent OB below may still hold.
5. Expired.
- Signs: a candle closes through the whole propulsion block and the parent OB. Both blocks have failed; the bullish structure may have broken.
Example: a bullish propulsion block on XAU/USD H1
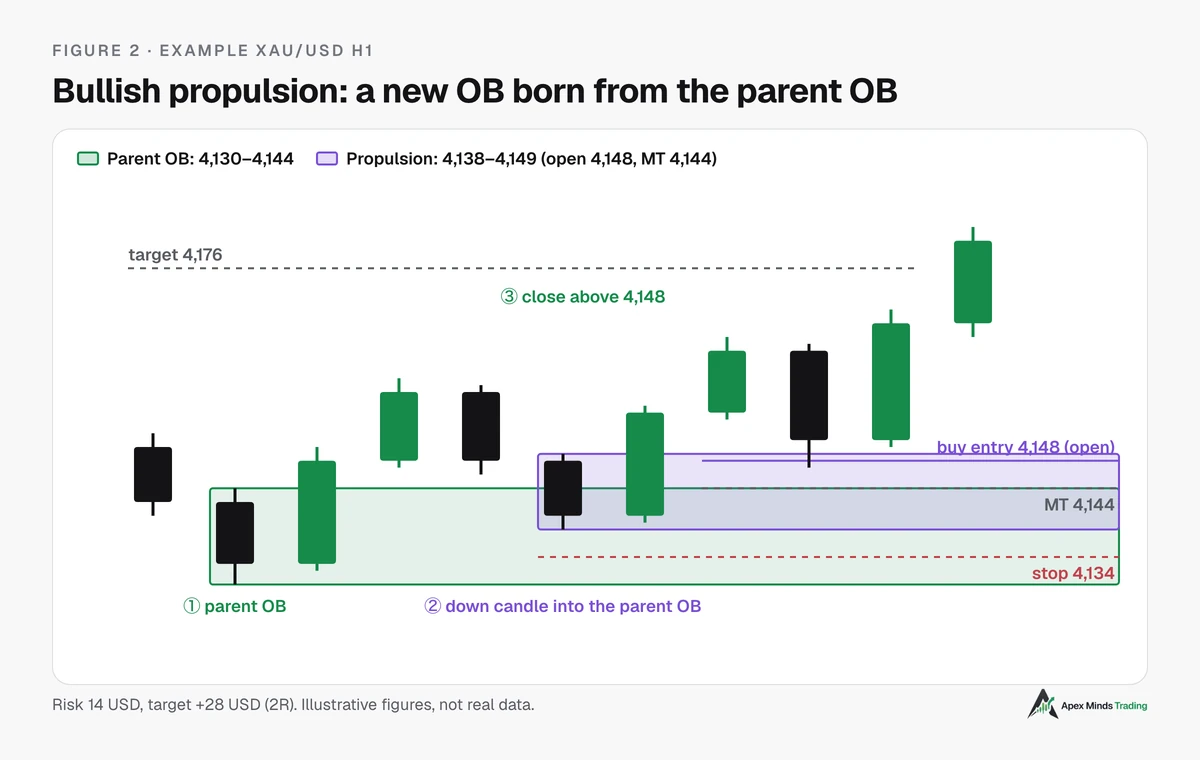
What happens:
- A parent OB forms at an H4 zone: the last down candle 4,130–4,144 (body 4,133–4,142). The next up candle closes at 4,148, above the 4,142 open, confirming the OB.
- Price rises to 4,160, then pulls back. A down candle opens at 4,148 (above the parent OB) and moves into the parent OB, dipping to 4,138. Its body is 4,140–4,148, with the lower part of the body inside the parent OB.
- The next candle closes at 4,155, above the 4,148 open. A bullish propulsion block forms: zone 4,138–4,149, open 4,148, MT 4,144.
- Price rises to 4,166 and pulls back; a wick touches 4,147 and the body closes at 4,151, above the MT. The propulsion block has been retested.
Trade plan:
- Buy entry: 4,148, at the propulsion block's open.
- Stop loss: below the propulsion low (4,138) by a buffer. The example uses 4 USD, giving 4,134. Measure a suitable buffer on your own broker.
- Target: 4,176 (illustrative).
- Calculating R: R = 4,148 − 4,134 = 14 USD. Profit 28 USD, or 2R. With a 1 USD buffer (stop at 4,137), R drops to 11 USD and the same target gives about 2.5R. That's why you should remember the formula, not the number.
The lectures allow the stop just on the other side of the propulsion candle's body, and say a stop at the low is safer. This series places it below the candle's low, because gold often sweeps a few dollars of wick.
When a propulsion block fails. The most common scenario: after the propulsion block forms, price pulls back and a body closes below 4,144 (the MT). The propulsion block weakens. Price drops further to the parent OB at 4,130–4,144, and if the parent OB still holds, price bounces from there. The lesson: the parent OB matters more than the propulsion block. Propulsion is just an earlier entry on a foundation that already exists. If a body closes below 4,130 (the parent OB low), both blocks have failed; exit.
Managing the trade after entry
These are this series' trade-management conventions, in line with the Breaker entry. Test them in your journal.
- Price reaches 1R: move the stop to entry. In exchange, some trades that would have won get closed at breakeven on a deep pullback.
- With mitigation: before 1R, keep the stop below low 3; don't drag it up tight to the zone. Low 3 is where price sweeps most.
- With propulsion: if a body closes below the MT but the parent OB isn't broken, you have two options. One is to exit early to cut the loss. The other is to hold with your pre-set stop, because the parent OB below may support price. Choose one, write it into the plan before entering, and stick with it over many trades.
- Don't add on the second touch of the same zone.
- Never move the stop further than its original level, under any circumstances.
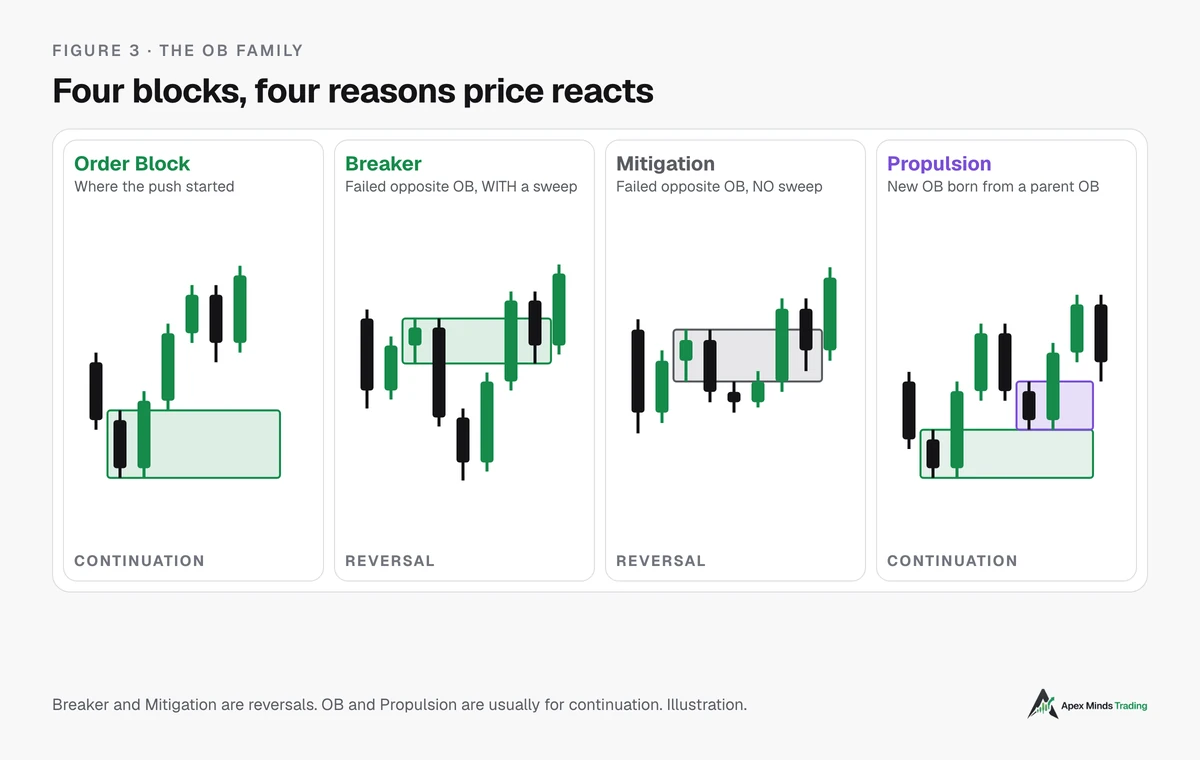
The OB family: four blocks, four reasons
- Order Block: where the push started. Used to follow the push.
- Breaker: an opposite OB that failed after a sweep. Used for reversals.
- Mitigation: an opposite OB that failed without a sweep. Used for reversals, but needs higher-timeframe context and a stop below low 3.
- Propulsion: a new OB born from a parent OB. Used for continuation.
Common mistakes
- Calling a breaker a mitigation block or vice versa. Always compare low 3 with low 1 before naming it.
- Treating equal lows as mitigation and entering immediately. That's the most exposed liquidity; wait for the sweep.
- Trading mitigation mid-trend with no higher-timeframe context. Every failure swing leaves liquidity, and without a higher-timeframe zone there is no reason for price to hold.
- Putting the mitigation stop above low 3.
- Calling any small OB in a trend a propulsion block. A propulsion block must move into a parent OB, and the parent OB must sit at a key zone.
- Entering a propulsion block after a body has closed beyond the MT. The zone has already weakened.
Frequently asked questions
How is a mitigation block different from a breaker block?
At point 3. A breaker has a sweep: low 3 is below low 1. A mitigation block has no sweep: low 3 is above low 1.
Is a propulsion block an order block?
Yes. A propulsion block is an OB that forms when price pulls back into a parent OB and then gets closed over. It is used to continue in the direction of the parent OB.
Are mitigation blocks worth trading?
Yes, but only with higher-timeframe context (price has just tapped an H4 zone or swept H4 liquidity), ideally with an FVG, and with the stop below low 3. Without those three, a mitigation block gets swept more easily than a breaker.
In short
- Mitigation block: an opposite OB that failed after a failure swing, with no sweep. Low 3 is clearly above low 1 (not equal lows).
- Mitigation leaves liquidity at low 3, so it needs higher-timeframe context, ideally an FVG, and a stop below low 3.
- Propulsion block: a new OB born from a parent OB on the pullback. Its open is very sensitive; no body should close beyond its MT.
- A propulsion block only counts when the parent OB sits at a key zone, and the parent OB always matters more than the propulsion block.
- States to remember: mitigation has a "low 3 swept" state; propulsion has a "weakened" state when price closes beyond the MT while the parent OB still holds.
Related concepts in the Dictionary
- What is an FVG (Entry 1), Order Blocks with FVGs (Entry 2), Breaker block (Entry 3).
- Displacement (Entry 5): the strong push at point 4 and at the propulsion confirmation step.
- BOS, MSS (Entry 6): the structure shift at point 4 of a mitigation block.
- Premium and discount, PD Array (Entry 7): mitigation and propulsion blocks are elements of the PD Array.
- Liquidity (Entry 8): why low 3 is the weak point of a mitigation block.
References
- Practical ICT book: chapter on mitigation blocks and the PD Array list.
- SMC material: chapter on order block types.
- ICT video lectures in Apex's reference library (mitigation blocks, propulsion blocks).
This article is for educational purposes only, is not investment advice and does not promise profits. Trading gold and leveraged products carries a high level of risk and you can lose your capital. Figures in the examples are illustrations.
